
I've recently bought an Intel 520 SSD, so my top priority for my laptop is to reduce the disk write during daily use. In the Java world, Maven is one of the most common build tool out there. My most used Maven command is:
mvn clean package
This command will do a fresh build of the project, then copy all the compiled classes/resources to the build directory of Maven (which is the folder 'target', next to your source directory). If you have a large Maven project at hand, this command will perform thousands disk write (clean compiled classes and resources, then compile Java classes and assemble the resources into WAR/JAR file). By changing the build directory of Maven to /tmp (which is a tmpfs mountpoint (residing on RAM on my ArchLinux)), I can now rebuild my project as many times as I like without the write amplication concern. Here is now I do it in Maven:
- Define a property name target.directory with the default value is target
- Under the build section in your POM file, add this tag <directory>${target.directory}</directory>
- Modify your settings.xml file to include this snippet in your active profile:
/tmp/maven/${project.groupId}-${project.artifactId}/target
And the sample settings.xml file:4.0.0 com.abc abc war 1.0 Sampe Webapp http://www.abc.com target junit junit 3.8.1 test abc ${target.directory} maven-eclipse-plugin 2.8 true true target target 2 ${project.build.outputDirectory}
Happy coding!development /tmp/maven/${project.groupId}-${project.artifactId}/target public-snapshots development
How to import Git projects from Bitbucket into Eclipse

Posted on 7:00 AM under bitbucket eclipse git 9 comments
This how-to is served as my memo to import a Bitbucket project into Eclipse. First things first, make sure you have an up-and-running Eclipse with EGit (in this how-to I am using Eclipse Indigo 3.7.2 with EGit 1.3.0)
- Create a folder to hold the workspace for your new project (You can skip this step if you want to use an existing workspace), I will use one of my project on Bitbucket in this how-to. It's GreenMail web application. So I create a folder name greenmail-webapp
- Open the Git Repositories view (it's under Windows -> Show View -> Other..., then under the Git category).
-
Click 'Clone a Git repository' and paste in the whole Git repo URL to the URI textbox, EGit will automatically fill in other textbox with the right value (so cool!), all you need is to enter the correct password. Then click 'Next'.

-
At the Branch Selection screen you are able to choose a branch to clone, my project has only one branch (master). If you clone an empty project from Bitbucket, just click next.

-
At the Local Destination, browse to your workspace directory for this project. I usually don't check-in the .project and .classpath files into the VCS, I just generate them locally right after I checkout/clone instead. If your build tool does not generate those files for you or you are the only one in this project, it'd better to check-in those files.

- Now, let's generate the Eclipse project files. I use Gradle as my build system, so it's just a command away.
gradle eclipse
Before running this, make sure you've already applied the 'eclipse' plugin in your build.gradle. If you use Maven, please include the maven-eclipse-plugin into your pom.xml and run the commandmvn eclipse:eclipse
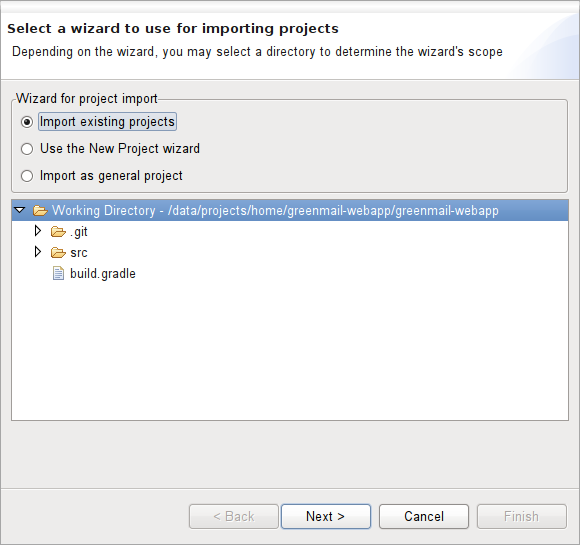
The above commands will generate/overwrite the .project and .classpath for you. Returning to your Eclipse, you can now Import your new cloned project into your workspace by right clicking on your in the Git Repository view, select Import Projects...

- Select Import existing projects

- Select the project you want to import.



Happy coding!
In my recent project, I have a need to monitor a directory for changes such as a new file created, modified or deleted. Surprisingly, JDK (up to JDK 6) does not have APIs to do that! JDK 7 does support it out of the box but I am stuck with the version 6
After looking around for an existing solution, I finally found that jNotify seems to fit the need. It supports all the three major platforms (Windows, Linux, and MacOS).The project has not released any update for nearly two years, so it's a little bit tricky to compile the native code. In this post, I will show you how! (at least on a Ubuntu Server 64bit)
In order to build anything serious on Ubuntu, you should install the package build-essentials
sudo apt-get install build-essential
Then download the source code of jNotify from its homepage. Extract it, open a terminal and issue the command: (assuming that you are at the directory jnotify-native-linux-0.93-src)
cd Release
make
On ArchLinux 64bit, the compilation will succeed and you will get a libjnotify.so in the same folder. But on my Ubuntu Server 10.04 LTS, I've got this:
/usr/include/asm-generic/fcntl.h:96: error: expected specifier-qualifier-list before ‘pid_t’After Googling around I found this thread. Basically, you have to change the file net_contentobjects_jnotify_linux_JNotify_linux.c by moving up the "unistd.h" up above the "sys/time.h". Now issue the command "make", the compilation will work as expected. Happy coding!
How to install Gradle templates plugin globally
Posted on 10:15 PM under gradle 2 comments
- Create a file called templates.gradle in the ~/.gradle/init.d/ folder (actually you can name it whatever you want as long as it has the extension .gradle)
- Edit that file and paste this little code snippet:
gradle.beforeProject { prj ->
   prj.apply from: 'http://launchpad.net/gradle-templates/trunk/latest/+download/apply.groovy'
}
Now, you can create a project structure event without a build.gradle with the command:
gradle createJavaProjectHappy coding!
Spring Security with Digest authentication and encoded password
Posted on 7:48 AM under digest authentication hashed password spring security 3 comments
The title says it all. This post will show you how to configure Spring Security with Digest authentication and encoded password. But first, here is the Spring Security documentation about digest authentication and encoded password:
The configured UserDetailsService is needed because DigestAuthenticationFilter must have direct access to the clear text password of a user. Digest Authentication will NOT work if you are using encoded passwords in your DAO. The DAO collaborator, along with the UserCache, are typically shared directly with a DaoAuthenticationProvider. The authenticationEntryPoint property must be DigestAuthenticationEntryPoint, so that DigestAuthenticationFilter can obtain the correct realmName and key for digest calculations.It's not all true. Let's take a look at the source code of DigestAuthenticationFilter
public void doFilter(ServletRequest req, ServletResponse res, FilterChain chain) throws IOException, ServletException {
    // omit code for simplicity

    // Compute the expected response-digest (will be in hex form)
    String serverDigestMd5;

    // Don't catch IllegalArgumentException (already checked validity)
    serverDigestMd5 = DigestAuthUtils.generateDigest(passwordAlreadyEncoded, username, realm, user.getPassword(),
                    request.getMethod(), uri, qop, nonce, nc, cnonce);
    // omit code for simplicty
}
Digging a little more into the method generateDigest of the class DigestAuthUtils, we have:
static String generateDigest(boolean passwordAlreadyEncoded, String username, String realm, String password,
                                        String httpMethod, String uri, String qop, String nonce, String nc, String cnonce)
            throws IllegalArgumentException {
    String a1Md5 = null;
    String a2 = httpMethod + ":" + uri;
    String a2Md5 = md5Hex(a2);

    if (passwordAlreadyEncoded) {
        a1Md5 = password;
    } else {
        a1Md5 = DigestAuthUtils.encodePasswordInA1Format(username, realm, password);
    }

   // The rest of the code
A little more into encodePasswordInA1Format of DigestAuthUtils:
static String encodePasswordInA1Format(String username, String realm, String password) {
    String a1 = username + ":" + realm + ":" + password;
    String a1Md5 = md5Hex(a1);

    return a1Md5;
}
From here, if we set the property passwordAlreadyEncoded of DigestAuthenticationFilter to true and create a suitable password encoder and salt source, we can make Spring Security digest authentication work with our tailored password encoder, salt source. Let's create them:
package com.mycompany.myproject;

import org.springframework.beans.factory.InitializingBean;
import org.springframework.security.authentication.dao.SaltSource;
import org.springframework.security.core.userdetails.UserDetails;
import org.springframework.util.Assert;

public class DigestAuthenticationAwareSaltSource implements SaltSource, InitializingBean {

    private String digestRealm;

    @Override
    public void afterPropertiesSet() throws Exception {
        Assert.hasText(digestRealm, "A Digest Realm must be set");
    }

    @Override
    public Object getSalt(UserDetails user) {
        return String.format("%s:%s:", user.getUsername(), digestRealm);
    }

    public void setDigestRealm(String digestRealm) {
        this.digestRealm = digestRealm;
    }
}
package com.mycompany.myproject;

import java.security.MessageDigest;
import java.security.NoSuchAlgorithmException;

import org.springframework.dao.DataAccessException;
import org.springframework.security.authentication.encoding.PasswordEncoder;
import org.springframework.security.core.codec.Hex;

public class DigestAuthenticationAwarePasswordEncoder implements PasswordEncoder {

    @Override
    public String encodePassword(String rawPass, Object salt) throws DataAccessException {
        String a1 = salt + rawPass;
        return md5Hex(a1);
    }

    @Override
    public boolean isPasswordValid(String encPass, String rawPass, Object salt) throws DataAccessException {
        String calculatedPass = md5Hex(salt + rawPass);
        return calculatedPass.equals(encPass);
    }

    private String md5Hex(String data) {
        MessageDigest digest;
        try {
            digest = MessageDigest.getInstance("MD5");
        } catch (NoSuchAlgorithmException e) {
            throw new IllegalStateException("No MD5 algorithm available!");
        }

        return new String(Hex.encode(digest.digest(data.getBytes())));
    }
}
And now you can do Digest Authentication with encoded password in Spring Security!
Setting up Jetty 7.4.x on CentOS 5.x as non-root daemon
Posted on 2:30 PM under centos daemon jetty non-root 1 comment
cd /opt
wget http://download.eclipse.org/jetty/stable-7/dist/jetty-distribution-7.4.5.v20110725.tar.gz
tar xzvf jetty-distribution-7.4.5.v20110725.tar.gz
ln -s jetty-distribution-7.4.5.v20110725 jetty
OK, we've just installed Jetty to /opt/jetty. Now we will setup Jetty to run on startup
cd /etc/init.d
ln -s /opt/jetty/bin/jetty.sh jetty
chkconfig --add jetty
chkconfig --level 345 jetty on
It's a good practice to run Jetty as a non-root user, let's create a normal user called jetty
useradd -m jetty
chown -R jetty:jetty /opt/jetty
Now edit the startup script of Jetty located at /opt/jetty/bin/jetty.sh to include the following lines at the beginning (right after a bulk of commented lines describing various variables for Jetty)
JAVA_HOME=/opt/java
JAVA=$JAVA_HOME/bin/java
JAVA_OPTIONS=" -server -Xms256m -Xmx1024m -XX:+DisableExplicitGC "
JETTY_HOME=/opt/jetty
JETTY_USER=jetty
JETTY_PORT=7070
JETTY_HOST=0.0.0.0 # If you don't set this to 0.0.0.0, jetty only listen on localhost
JETTY_LOGS=/opt/jetty/logs/
Now start up it:
service jetty startOpen your browser and navigate to http://