In my previous post, I successfully managed to put all the output of Maven (and Eclipse) into RAM to reduce the disk write. In today post, I will do the same thing but with Gradle. Here is my build.gradle
apply plugin: "java"
apply plugin: "war"
apply plugin: "eclipse"

sourceCompatibility = 1.6
targetCompatibility = 1.6

group = "me.tinhtruong"
version = "1.0"

repositories {
    mavenCentral()
}

dependencies {
    compile "com.icegreen:greenmail:1.3.1b"
    compile "jstl:jstl:1.2"
    providedCompile "javax.servlet:servlet-api:2.5"
}
// Change the buildDir of the current project to /tmp/ (which is mounted on RAM using tmpfs)
buildDir = new File("/tmp/gradle/" + project.name);

// First, create a linked resource pointing to our Gradle buildDir, then hook into the .classpath file generation of Gradle to change the output of Eclipse to that linked resource.
eclipse {
 project {
  linkedResource name: 'build', type:'2', location: buildDir.absolutePath
 }
 classpath {
  file {
   whenMerged { classpath ->
    classpath.entries.each { entry ->
     if (entry.kind == 'output') {
      entry.path = 'build/eclipse-output';
     }
    }
   }
  }
 }
}

I've recently bought an Intel 520 SSD, so my top priority for my laptop is to reduce the disk write during daily use. In the Java world, Maven is one of the most common build tool out there. My most used Maven command is:
mvn clean package
This command will do a fresh build of the project, then copy all the compiled classes/resources to the build directory of Maven (which is the folder 'target', next to your source directory). If you have a large Maven project at hand, this command will perform thousands disk write (clean compiled classes and resources, then compile Java classes and assemble the resources into WAR/JAR file). By changing the build directory of Maven to /tmp (which is a tmpfs mountpoint (residing on RAM on my ArchLinux)), I can now rebuild my project as many times as I like without the write amplication concern. Here is now I do it in Maven:
- Define a property name target.directory with the default value is target
- Under the build section in your POM file, add this tag <directory>${target.directory}</directory>
- Modify your settings.xml file to include this snippet in your active profile:
/tmp/maven/${project.groupId}-${project.artifactId}/target
And the sample settings.xml file:4.0.0 com.abc abc war 1.0 Sampe Webapp http://www.abc.com target junit junit 3.8.1 test abc ${target.directory} maven-eclipse-plugin 2.8 true true target target 2 ${project.build.outputDirectory}
Happy coding!development /tmp/maven/${project.groupId}-${project.artifactId}/target public-snapshots development
How to import Git projects from Bitbucket into Eclipse

Posted on 7:00 AM under bitbucket eclipse git 9 comments
This how-to is served as my memo to import a Bitbucket project into Eclipse. First things first, make sure you have an up-and-running Eclipse with EGit (in this how-to I am using Eclipse Indigo 3.7.2 with EGit 1.3.0)
- Create a folder to hold the workspace for your new project (You can skip this step if you want to use an existing workspace), I will use one of my project on Bitbucket in this how-to. It's GreenMail web application. So I create a folder name greenmail-webapp
- Open the Git Repositories view (it's under Windows -> Show View -> Other..., then under the Git category).
-
Click 'Clone a Git repository' and paste in the whole Git repo URL to the URI textbox, EGit will automatically fill in other textbox with the right value (so cool!), all you need is to enter the correct password. Then click 'Next'.

-
At the Branch Selection screen you are able to choose a branch to clone, my project has only one branch (master). If you clone an empty project from Bitbucket, just click next.

-
At the Local Destination, browse to your workspace directory for this project. I usually don't check-in the .project and .classpath files into the VCS, I just generate them locally right after I checkout/clone instead. If your build tool does not generate those files for you or you are the only one in this project, it'd better to check-in those files.

- Now, let's generate the Eclipse project files. I use Gradle as my build system, so it's just a command away.
gradle eclipse
Before running this, make sure you've already applied the 'eclipse' plugin in your build.gradle. If you use Maven, please include the maven-eclipse-plugin into your pom.xml and run the commandmvn eclipse:eclipse
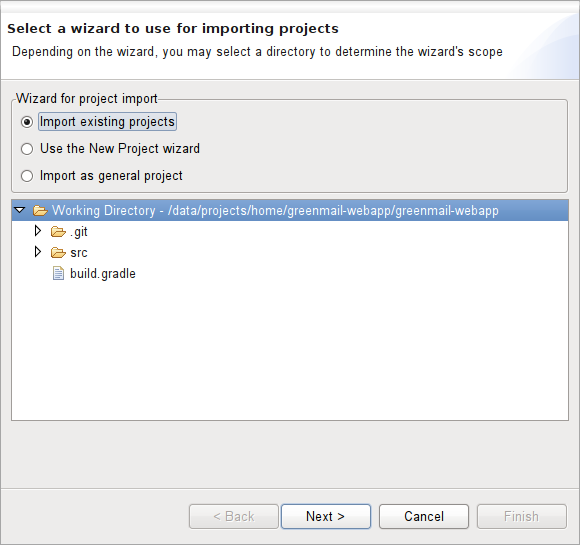
The above commands will generate/overwrite the .project and .classpath for you. Returning to your Eclipse, you can now Import your new cloned project into your workspace by right clicking on your in the Git Repository view, select Import Projects...

- Select Import existing projects

- Select the project you want to import.


Happy coding!