Monitoring filesystem changes using Java

Posted on 9:41 AM under filesystem jdk7 monitoring 0 comment
During the past few months, I have chances to work in projects which have the requirement to monitor a specific folder on the filesystem for changes and act accordingly (e.g import structured file from a FTP upload folder). The following solutions I found useful to fulfill the above requirements:
jNotify
Pros: easy to use, cross-platform (kind of, because jNotify author has developed native code implementation for 3 platforms: Windows, Linux, and MacOS X), can be used with Java 1.4+
Cons: there are a few limitations on each platform as noted on its website.
I've got a problem when I tried to run it on a Ubuntu 64bit machine, but after searching on their forum on sourceforge, I've found my solutions (by recompiling the native code). I've used it in production since then and it never failed me. But there is a catch: when you move files/folders into your monitored folders, it won't detect the event as new files/folders created. I think it's because Linux only updates (and not creates) the inodes of those files/folders on the ext4 filesystem. In order for your Java application to pickup the native code, you have to put the native library (.so for Linux, .dll for Windows) in the folder specified by the system property java.library.path
JPathWatch
Pros: cross-platform (including Windows, Linux, MacOS X and FreeBSD), the native library is bundled inside the distribution jar so all you have to do is including its jar in the classpath.
Cons: the API is a little hard to use (the author do not use the observer pattern due to the scalability), requires Java 5+
WatchService in JDK 7
Pros: built-in in standard distribution of Java 7, no other external libraries or native code is required.
Cons: you have to use Java 7, of course. This sometimes is a showstopper in various projects, although Java 6 is about to reach EOL (in November this year)
You can download all the sample code at https://bitbucket.org/tinhtruong/blog-samples/src/6d3ce2ac58a8/filesystem-monitoring
Spring Security Acl with Mongodb data store is now released
Posted on 7:44 AM under acl gradle mongodb spring security 5 comments
I just released the first public version of Spring Security Acl with Mongodb as the data store at https://bitbucket.org/tinhtruong/spring-security-acl-mongodb. Inspired from Spring implementation based on JDBC, I leverage the power of the Spring Data Mongodb to implement the retrieve strategy for ACL stuff. The implementation is based on Spring Security 3.1.0.RELEASE (the latest version at this time).
It is released under Apache 2.0 license, so you can use it in your commercial projects.
I use Gradle as the build system. So if you want to build from the source, make sure you have an up-and-running Gradle 1.0. To create a jar:
gradle jar
Feedback are welcome!
In integration tests, I often need to setup the database to a determined state before every test case. In order to do that, we need to create database schema which reflect your current models and then populate with proper data. In today post, I will show you how to generate the database schema from your Hibernate models by using the Hibernate Maven Plugin (3.0). In my shop, we are still using the "old-school" Hibernate mapping: XML!. The reason is we want to keep our models pristine (no annotations or whatever). We use Maven as our build tool, so here is the plugin configuration that works:
We use Spring to configure Hibernate directly, the hibernate.cfg.xml used here is just for this purpose only (ie. generating the database schema). Here is it just for the sake of completeness:org.codehaus.mojo hibernate3-maven-plugin 3.0 create-schema process-test-resources run
        org.hibernate.dialect.HSQLDialect
        org.hsqldb.jdbcDriver
        jdbc:hsqldb:mem:sample_db
        sa
There are other operations that you can utilize with Hibernate Tools. For more information, please refer to Hibernate Tools documentation and the hibernate3-maven-plugin site
.I have a chance to use Lucene (3.6.0) to implement a full-text search in one of my recent projects. One of the requirements is to highlight the matched text in the result. The highlighted text should be displayed in the whole paragraph (not just a small text fragment). Here is my snippet to achieve this:
private String getHighlightedField(Query query, Analyzer analyzer, String fieldName, String fieldValue) throws IOException, InvalidTokenOffsetsException {
    Formatter formatter = new SimpleHTMLFormatter("", "");
    QueryScorer queryScorer = new QueryScorer(query);
    Highlighter highlighter = new Highlighter(formatter, queryScorer);
    highlighter.setTextFragmenter(new SimpleSpanFragmenter(queryScorer, Integer.MAX_VALUE));
    highlighter.setMaxDocCharsToAnalyze(Integer.MAX_VALUE);
    return highlighter.getBestFragment(this.analyzer, fieldName, fieldValue);
}
- By creating a SimpleSpanFragmenter with a very big fragment size, we can display the highlighted text in the whole paragraph or document. Lucene also does a nice thing here for free, by merging all the highlighted text fragments into one big chunk (or our original paragraph/document)
- query: is the Lucene query you constructed to do the search
- analyzer: is the Lucene analyzer are used to analyzed the field when you create the index for that field
Happy highlighting!
In my previous post, I successfully managed to put all the output of Maven (and Eclipse) into RAM to reduce the disk write. In today post, I will do the same thing but with Gradle. Here is my build.gradle
apply plugin: "java"
apply plugin: "war"
apply plugin: "eclipse"

sourceCompatibility = 1.6
targetCompatibility = 1.6

group = "me.tinhtruong"
version = "1.0"

repositories {
    mavenCentral()
}

dependencies {
    compile "com.icegreen:greenmail:1.3.1b"
    compile "jstl:jstl:1.2"
    providedCompile "javax.servlet:servlet-api:2.5"
}
// Change the buildDir of the current project to /tmp/ (which is mounted on RAM using tmpfs)
buildDir = new File("/tmp/gradle/" + project.name);

// First, create a linked resource pointing to our Gradle buildDir, then hook into the .classpath file generation of Gradle to change the output of Eclipse to that linked resource.
eclipse {
 project {
  linkedResource name: 'build', type:'2', location: buildDir.absolutePath
 }
 classpath {
  file {
   whenMerged { classpath ->
    classpath.entries.each { entry ->
     if (entry.kind == 'output') {
      entry.path = 'build/eclipse-output';
     }
    }
   }
  }
 }
}

I've recently bought an Intel 520 SSD, so my top priority for my laptop is to reduce the disk write during daily use. In the Java world, Maven is one of the most common build tool out there. My most used Maven command is:
mvn clean package
This command will do a fresh build of the project, then copy all the compiled classes/resources to the build directory of Maven (which is the folder 'target', next to your source directory). If you have a large Maven project at hand, this command will perform thousands disk write (clean compiled classes and resources, then compile Java classes and assemble the resources into WAR/JAR file). By changing the build directory of Maven to /tmp (which is a tmpfs mountpoint (residing on RAM on my ArchLinux)), I can now rebuild my project as many times as I like without the write amplication concern. Here is now I do it in Maven:
- Define a property name target.directory with the default value is target
- Under the build section in your POM file, add this tag <directory>${target.directory}</directory>
- Modify your settings.xml file to include this snippet in your active profile:
/tmp/maven/${project.groupId}-${project.artifactId}/target
And the sample settings.xml file:4.0.0 com.abc abc war 1.0 Sampe Webapp http://www.abc.com target junit junit 3.8.1 test abc ${target.directory} maven-eclipse-plugin 2.8 true true target target 2 ${project.build.outputDirectory}
Happy coding!development /tmp/maven/${project.groupId}-${project.artifactId}/target public-snapshots development
How to import Git projects from Bitbucket into Eclipse
Posted on 7:00 AM under bitbucket eclipse git 9 comments
This how-to is served as my memo to import a Bitbucket project into Eclipse. First things first, make sure you have an up-and-running Eclipse with EGit (in this how-to I am using Eclipse Indigo 3.7.2 with EGit 1.3.0)
- Create a folder to hold the workspace for your new project (You can skip this step if you want to use an existing workspace), I will use one of my project on Bitbucket in this how-to. It's GreenMail web application. So I create a folder name greenmail-webapp
- Open the Git Repositories view (it's under Windows -> Show View -> Other..., then under the Git category).
-
Click 'Clone a Git repository' and paste in the whole Git repo URL to the URI textbox, EGit will automatically fill in other textbox with the right value (so cool!), all you need is to enter the correct password. Then click 'Next'.

-
At the Branch Selection screen you are able to choose a branch to clone, my project has only one branch (master). If you clone an empty project from Bitbucket, just click next.

-
At the Local Destination, browse to your workspace directory for this project. I usually don't check-in the .project and .classpath files into the VCS, I just generate them locally right after I checkout/clone instead. If your build tool does not generate those files for you or you are the only one in this project, it'd better to check-in those files.

- Now, let's generate the Eclipse project files. I use Gradle as my build system, so it's just a command away.
gradle eclipse
Before running this, make sure you've already applied the 'eclipse' plugin in your build.gradle. If you use Maven, please include the maven-eclipse-plugin into your pom.xml and run the commandmvn eclipse:eclipse
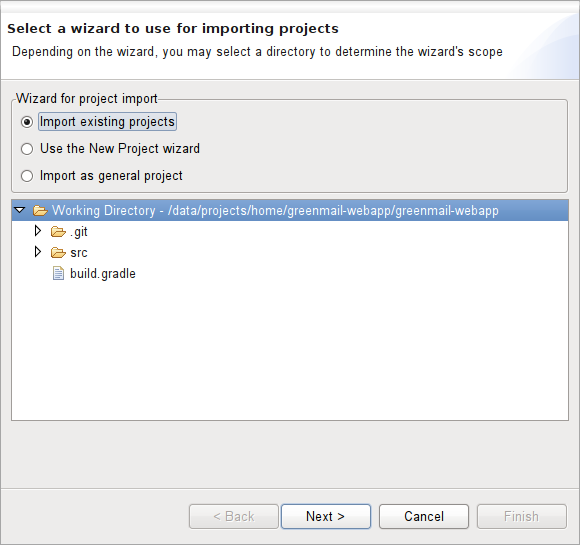
The above commands will generate/overwrite the .project and .classpath for you. Returning to your Eclipse, you can now Import your new cloned project into your workspace by right clicking on your in the Git Repository view, select Import Projects...

- Select Import existing projects

- Select the project you want to import.


Happy coding!
In my recent project, I have a need to monitor a directory for changes such as a new file created, modified or deleted. Surprisingly, JDK (up to JDK 6) does not have APIs to do that! JDK 7 does support it out of the box but I am stuck with the version 6
After looking around for an existing solution, I finally found that jNotify seems to fit the need. It supports all the three major platforms (Windows, Linux, and MacOS).The project has not released any update for nearly two years, so it's a little bit tricky to compile the native code. In this post, I will show you how! (at least on a Ubuntu Server 64bit)
In order to build anything serious on Ubuntu, you should install the package build-essentials
sudo apt-get install build-essential
Then download the source code of jNotify from its homepage. Extract it, open a terminal and issue the command: (assuming that you are at the directory jnotify-native-linux-0.93-src)
cd Release
make
On ArchLinux 64bit, the compilation will succeed and you will get a libjnotify.so in the same folder. But on my Ubuntu Server 10.04 LTS, I've got this:
/usr/include/asm-generic/fcntl.h:96: error: expected specifier-qualifier-list before ‘pid_t’After Googling around I found this thread. Basically, you have to change the file net_contentobjects_jnotify_linux_JNotify_linux.c by moving up the "unistd.h" up above the "sys/time.h". Now issue the command "make", the compilation will work as expected. Happy coding!
How to install Gradle templates plugin globally
Posted on 10:15 PM under gradle 2 comments
- Create a file called templates.gradle in the ~/.gradle/init.d/ folder (actually you can name it whatever you want as long as it has the extension .gradle)
- Edit that file and paste this little code snippet:
gradle.beforeProject { prj ->
   prj.apply from: 'http://launchpad.net/gradle-templates/trunk/latest/+download/apply.groovy'
}
Now, you can create a project structure event without a build.gradle with the command:
gradle createJavaProjectHappy coding!